This page is just another way for me to collect some notes as I begin learning about micropython.
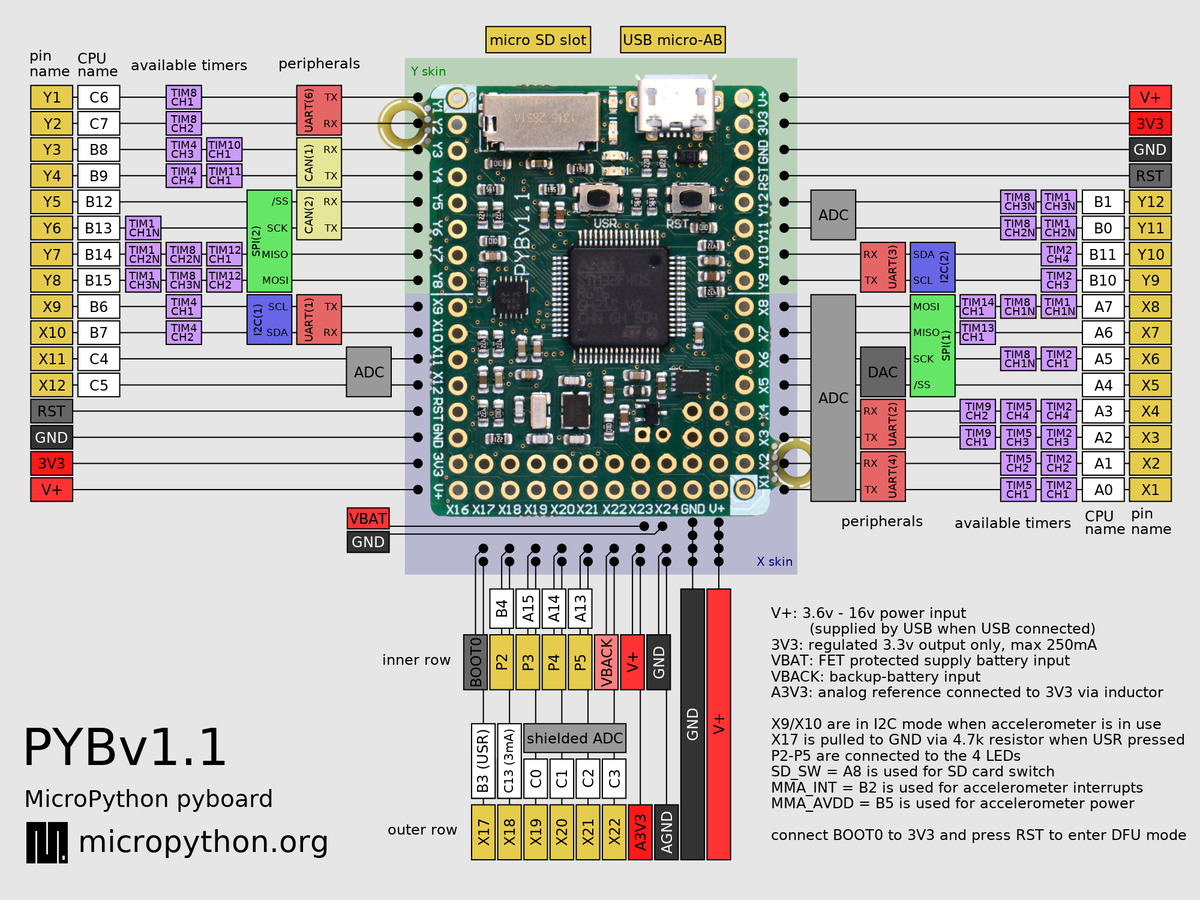
I bought a mp board of eBay for about $15, then bought a set of pin sockets to solder onto it (Dec 2017). MicroPython v1.9.2-87-gda8c4c26 on 2017-09-13; PYBv1.1 with STM32F405RG
Of course I’m using Linux(Debian), so I needed to become a little familiar with the ‘screen’ program to connect to the board (via USB). The docs say to connect to /dev/ttyACM0, but I also needed to see what group owns that tty so that I could make myself a member (dialout), then logout and back in.
Since the board doesn’t have an OS, exiting the connection is different than I was accustomed to… use screen commands to exit the connection (^C-a ), or unmounting if I had it mounted for some reason.
The board REPL does not have an exit() function (hah!) and it sometimes takes a minute for me to figure out when I best should interrupt the running process with ^C or press the RST button on the board. Programmatically I can do a pyb.hard_reset() but not sure yet when that’s appropriate.
Downloaded the ‘ampy’ program from Adafruit- makes running scripts much easier! See https://learn.adafruit.com/micropython-basics-load-files-and-run-code/install-ampy I then created an alias in my .bash_aliases file for it: alias amp='ampy --port /dev/ttyACM0 run --no-output'.
The https://forum.micropython.org is very informative!
I also bought “Python for Microcontrollers” by Donald Norris.
from http://docs.micropython.org/en/latest/pyboard/pyboard/tutorial/reset.html:

7.1. Safe mode

To enter safe mode, do the following steps:

    1. Connect the pyboard to USB so it powers up.
    2. Hold down the USR switch.
    3. While still holding down USR, press and  release the RST switch.
    4. The LEDs will then cycle green to orange to green+orange and back again.
    5. Keep holding down USR until only the orange LED is lit, and then let go of the USR switch.
    6. The orange LED should flash quickly 4 times, and then turn off.
    7. You are now in safe mode.

In safe mode, the boot.py and main.py files are not executed, and so the pyboard boots up with default settings. This means you now have access to the filesystem (the USB drive should appear), and you can edit boot.py and main.py to fix any problems.

Entering safe mode is temporary, and does not make any changes to the files on the pyboard.


7.2. Factory reset the filesystem

If you pyboard’s filesystem gets corrupted (for example, you forgot to eject/unmount it), or you have some code in boot.py or main.py which you can’t escape from, then you can reset the filesystem.

Resetting the filesystem deletes all files on the internal pyboard storage (not the SD card), and restores the files boot.py, main.py, README.txt and pybcdc.inf back to their original state.

To do a factory reset of the filesystem you follow a similar procedure as you did to enter safe mode, but release USR on green+orange:

    1. Connect the pyboard to USB so it powers up.
    2. Hold down the USR switch.
    3. While still holding down USR, press and release the RST switch.
    4. The LEDs will then cycle green to orange to green+orange and back again.
    5. Keep holding down USR until both the green and orange LEDs are lit, and then let go of the USR switch.
    6. The green and orange LEDs should flash quickly 4 times.
    7. The red LED will turn on (so red, green and orange are now on).
    8. The pyboard is now resetting the filesystem (this takes a few seconds).
    9. The LEDs all turn off.
    10. You now have a reset filesystem, and are in safe mode.
    11. Press and release the RST switch to boot normally.
The way to connect your board to the external world, and control other components, is through the GPIO pins. Not all pins are available to use, in most cases
only pins 0, 2, 4, 5, 12, 13, 14, 15, and 16 can be used.
The tool to check memory availability is micropython.mem_info()

(you need to import the module micropython.
It does not give you details module by module but if you run it before
and after each import, it does give you an indication on what's happening.

gc.mem_free() and gc.mem_alloc() are your friends here, returning no. of
 bytes as integers. The sum of the two is total heap size.
I would avoid using the chr() function converting integers into text
 characters, and instead use ustruct to convert integer values into
  bytes. MicroPython uses UTF8 internally for representing text
   characters, and not all sequences of bytes are valid.

* Personally, I tend to use bytearrays. If you want to reduce memory
 allocations you can combine allocating a bytearray, and then create a
  memoryview onto it, and pass the memoryview to the write command.

Here's an example of using a bytearray (it will allocate a new one each
   time its called, like using ustruct.pack):

packet = bytearray((0xff, 0xff, servo_id, 4, 3, 0x19, 1, 0))